Wastin’ Time: Jess Mancini chirps in with tips for crafting your own bird feeder
-
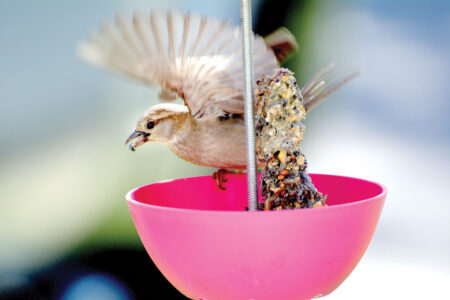
- A bird takes flight with a morsel from the DIY bird feeder and seed cake. (Photo by Jess Mancini)
-

- Materials to make this bird feeder are a plastic bowl and plate, top, and, from left, three nylon lock nuts, four washers, a cap nut, a wingnut and, bottom, a 1/4 inch threaded rod. (Photo by Jess Mancini)
-
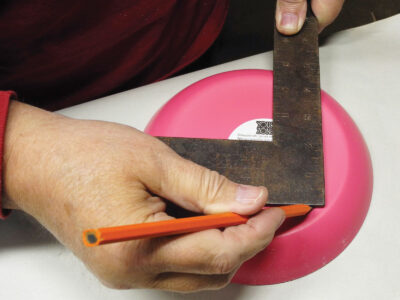
- Using a square to find the center of a circle, in this case a plate. The procedure is described in the text. (Photo by Jess Mancini)
-
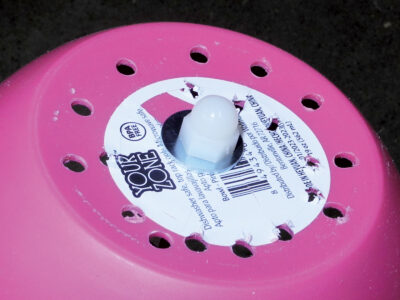
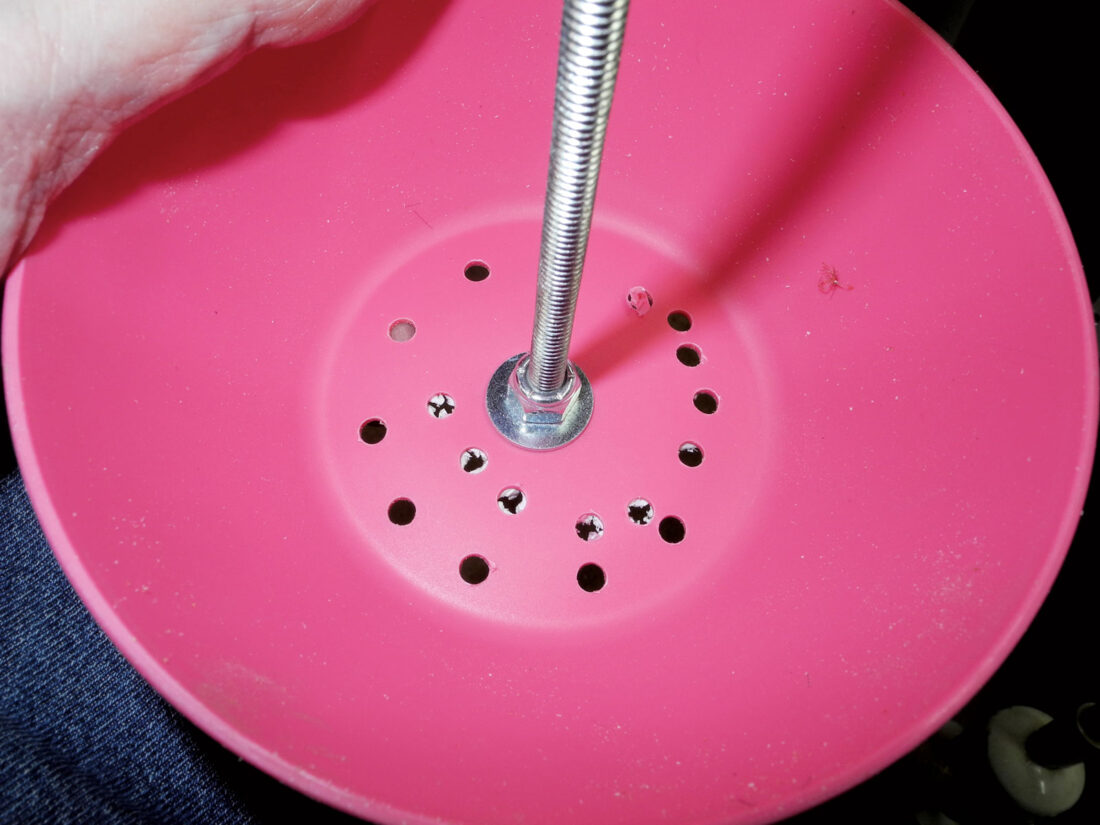
- The bottom of the feeder shows the tightened cap nut with washer. The holes are for rain water drainage. (Photo by Jess Mancini)
-

- The washer and nut that is tightened against the bottom bowl of the feeder and the cap nut. The same is done at the top, but a wingnut replaces the cap nut so the top can be removed and the feeder refilled with a new cake, then reattached and hung. (Photo by Jess Mancini)
-
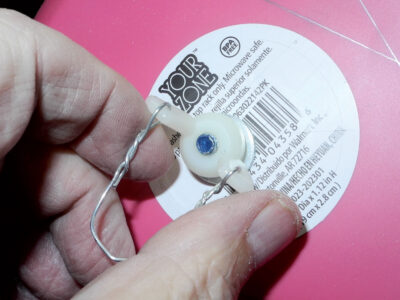
- The top of the feeder shows how the wire is attached through the holes drilled in the plastic wingnut. (Photo by Jess Mancini)
-
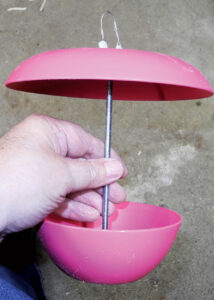
- Assembled and ready for birds to enjoy. Weather resistant parts are used so the feeder can last a long time without maintenance. (Photo by Jess Mancini)
-

- Using a drill press to drill a 1/4 inch hole through the plate. A hand drill also can be used. (Photo by Jess Mancini)
-

- I use a smaller drill press to drill the small hole in the wings of the wing nut. (Photo by Jess Mancini)

A bird takes flight with a morsel from the DIY bird feeder and seed cake. (Photo by Jess Mancini)
Last year in the May episode of Wastin’ Time I explained how I make bird seed cakes in my shop at a cost much less than what the stores charge. This installment describes the bird feeder I made, also much cheaper than store-bought feeders.
My bird feeder to hold the DIY cakes is the best design I have ever seen. Bravado? Yes it is, but I wouldn’t say it if it wasn’t true. My feeder is cheap, durable, weather-resistant, nearly unbreakable if it falls or is tossed about by the wind and birds appear to enjoy it, too. It’s like that line the spectre whispers to Kevin Costner in “Field of Dreams.”
First gather all materials and tools. That would be called mise en place by the French Chef.
Tools needed are a drill press or hand drill, a 1/4 inch drill bit, a 1/16th inch drill bit or smaller and an adjustable wrench. Materials are a plastic cereal bowl and a plastic plate, both available at Walmart for about 50 cents each, one plastic wing nut available in the specialty fasteners at Lowes, a quarter-inch threaded rod of about 8 inches, four washers, three nylon lock nuts and a cap nut for the threaded rod and stainless steel binding wire I buy at Harbor Freight. I think the plates come in different colors, but for 50 cents I don’t care what color they are and I’m sure the birds don’t care either.
The plate acts as an umbrella to prevent rain from soaking the cake. The cake sits in the cereal bowl, of which the rim is a perch for hungry birds. The rod is what the cake, with a hole in the center made during the molding process, slips over and is held in the feeder.
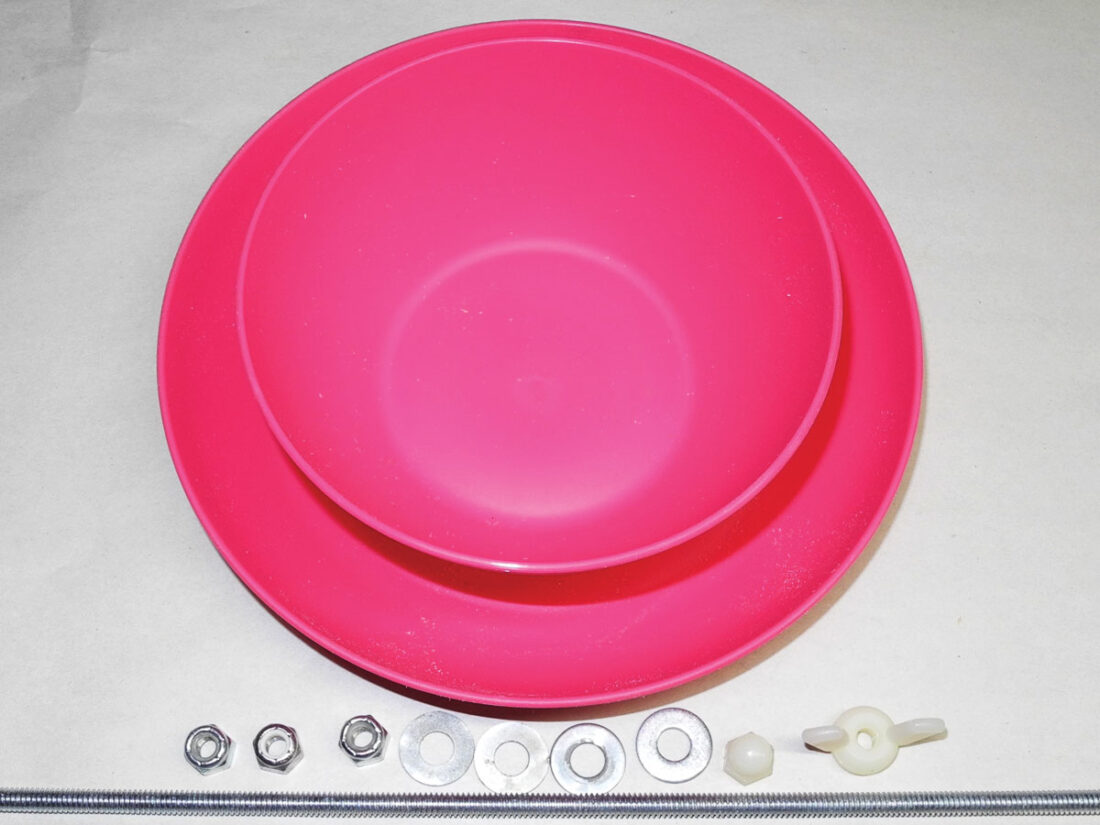
Materials to make this bird feeder are a plastic bowl and plate, top, and, from left, three nylon lock nuts, four washers, a cap nut, a wingnut and, bottom, a 1/4 inch threaded rod. (Photo by Jess Mancini)
A nut and a cap nut hold the bowl at the bottom and are not removed. The wing nut allows the plate to be removed to insert the cakes.
Find the centers of the plate and bow. If there’s a manufacturing indentation of the center, then chuck the 1/4 inch bit in the drill and bore a hole in the center of the bowl and the plate. If the centers are not visible from the manufacturing process, the centers can be found using a carpenter’s square.
Just in case I’ll explain the way I find the centers because the information can be used in other projects, which is a Wastin’ Time prime directive. Other ways can be used to find the center. This is how I do it.
Put the corner or point of the carpenter’s square at the edge of the circle and draw a straight line from each side of the square to where it intersects the circle. Connect the two points of intersection with a straight line. Move the corner of the square to another spot on the circle and repeat the first process. The point of intersection where the two lines scribed from the points where the circle is intersected is the center. A third and fourth line may improve accuracy, but to be honest, accuracy is not that important in this application. After the center is found, drill the quarter inch hole through the bowl and the plate. I also drilled numerous quarter inch holes on the bottom of the bowl for rain water to drain.
This next part could be tricky, so take care. With the 1/16th inch bit, drill the hole through each of the two wings on the wing nut. In these holes a length of the stainless steel wire is connected to make a loop to hang the feeder.

Using a square to find the center of a circle, in this case a plate. The procedure is described in the text. (Photo by Jess Mancini)
Parts are ready for assembly.
Drive a nut on one end of the rod just enough inside that the cap nut will tighten against the surface of the bowl. Place a washer at the base of the nut, insert the rod into the hole in the bowl, place another washer on the rod on the outside of the bowl and thread the cap nut onto the end. Tighten the inside nut against the bottom of the bowl.
The procedure is the same for the top plate. Drive a nut onto the rod, install a washer, insert it into the hole of the plate, put a washer on the rod on the outside of the plate, then thread the wing nut onto the rod and tighten.
To install a seed cake, remove the wing nut and plate, stick the rod through the hole in the cake, reinstall the plate and tighten the wing nut. Lastly, hang the feeder where you and the birds will enjoy it.
If you build it, they will come.
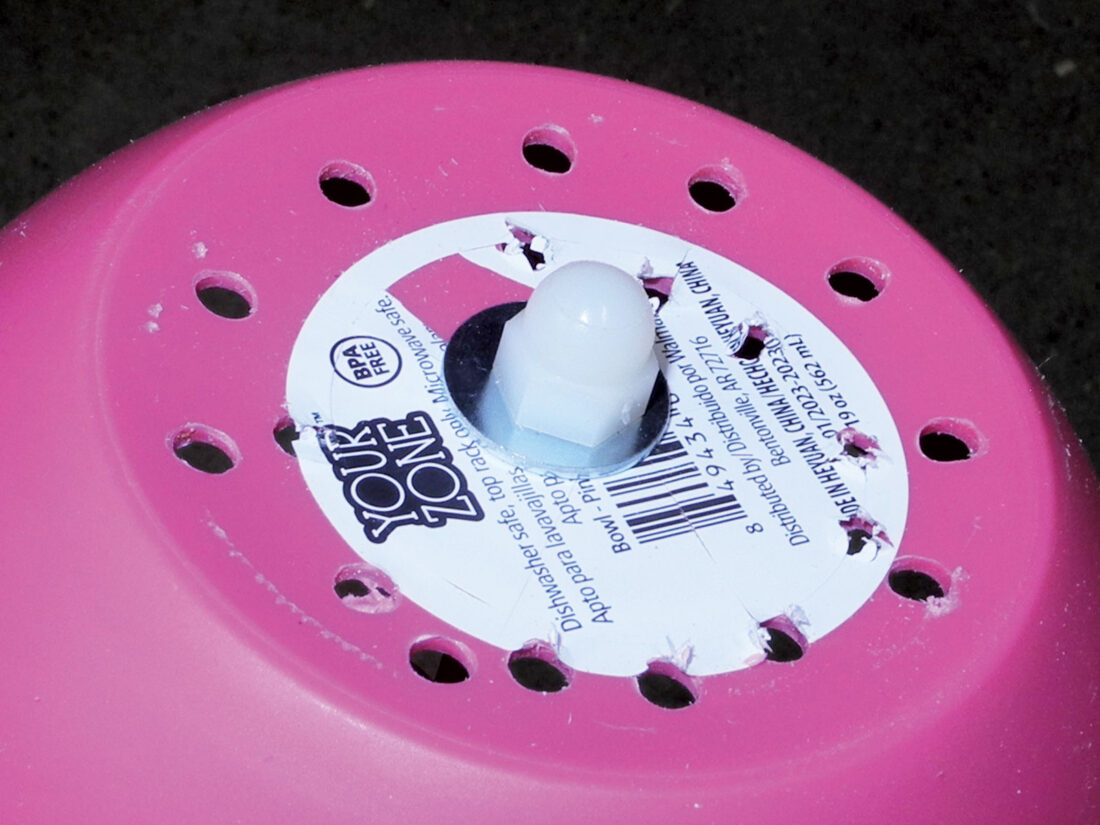
The bottom of the feeder shows the tightened cap nut with washer. The holes are for rain water drainage. (Photo by Jess Mancini)
***
Unless you think this column wasn’t enough of a waste of time, send ideas for “Wastin’ Time with Jess Mancini” to Jess Mancini at jmancini@newsandsentinel.com.
The washer and nut that is tightened against the bottom bowl of the feeder and the cap nut. The same is done at the top, but a wingnut replaces the cap nut so the top can be removed and the feeder refilled with a new cake, then reattached and hung. (Photo by Jess Mancini)

The top of the feeder shows how the wire is attached through the holes drilled in the plastic wingnut. (Photo by Jess Mancini)

Assembled and ready for birds to enjoy. Weather resistant parts are used so the feeder can last a long time without maintenance. (Photo by Jess Mancini)
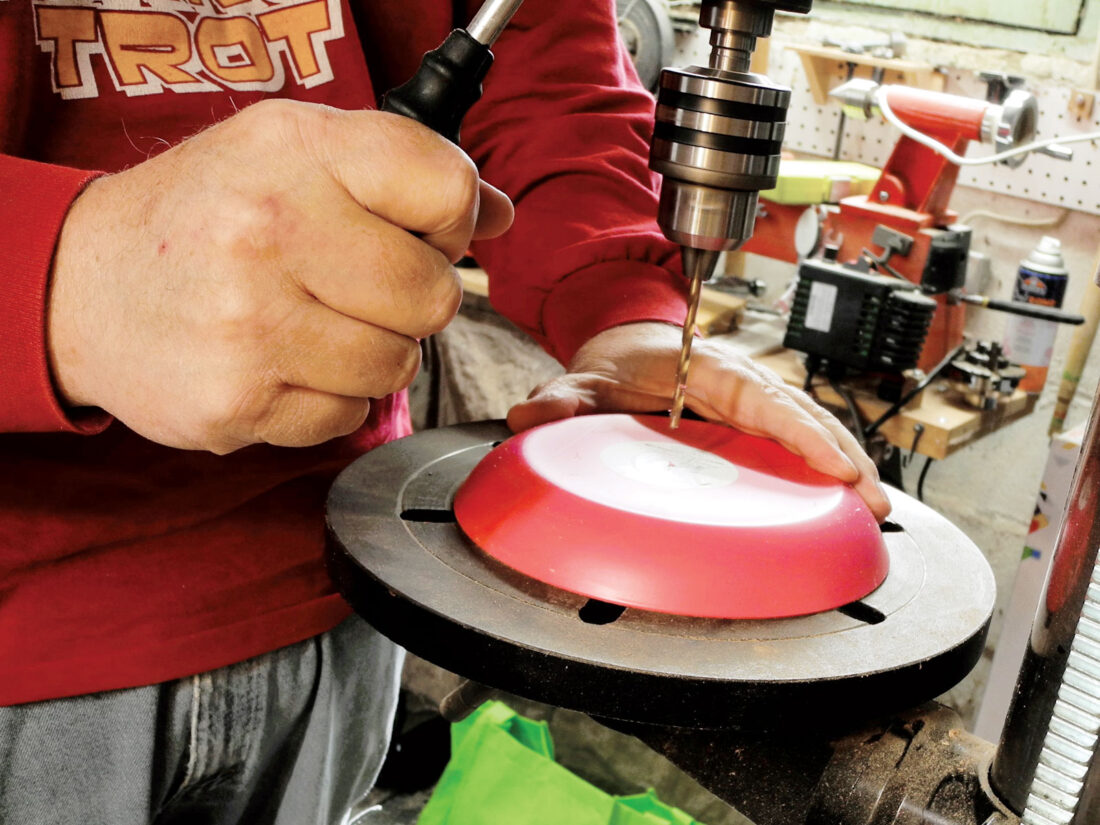
Using a drill press to drill a 1/4 inch hole through the plate. A hand drill also can be used. (Photo by Jess Mancini)

I use a smaller drill press to drill the small hole in the wings of the wing nut. (Photo by Jess Mancini)
Local columns

The Way I See It: Museum has been part of the riverbank for a half century

Reporter’s Notebook: Signs and portents
Look Back: History and heritage – Parkersburg’s Centennial Chapter, NSDAP celebrates its 127th birthday

Kiki’s Corner: Visiting Greece, revisiting its history

Cracking the Code: Some gave all. Can we give a little?