The Crochet Lady: Let’s make a circle
-
- (Photo composite provided by Maurita Way)
-

- (Photo composite provided by Maurita Way)
-

- (Photo composite provided by Maurita Way)
(Photo composite provided by Maurita Way)
Hello fellow artists. I am Maurita the Crochet Lady. Welcome back to anyone who read my introduction. If you are new here, I hope you benefit from reading about my artistic journey.
A quick review must include these three things. The main one is NEVER cut yarn tails, which means yarn ends need to be knotted in some way then sewn or hidden in the crochet piece. Another is to try to keep your body relaxed even when struggling with a new stitch, technique, or complicated pattern. The last one is about right- or left-handed crochet. Left-handed does not change the stitches but could require adjustment because most patterns label everything for right-handed.
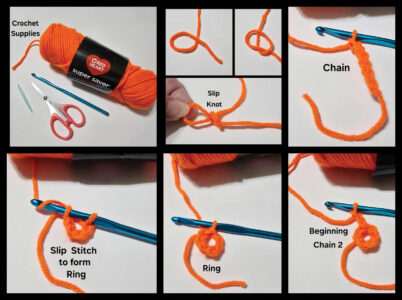
For supplies, when first starting out, I recommend light colored worsted weight yarn and a size “H” 5mm hook. I was taught with bright orange ‘Red Heart’ yarn and 5mm ‘Susan Bates’ hook (an ‘inline style’ hook, which tends to split yarn less). You will also need scissors and a ‘yarn’ or ‘finishing’ needle.
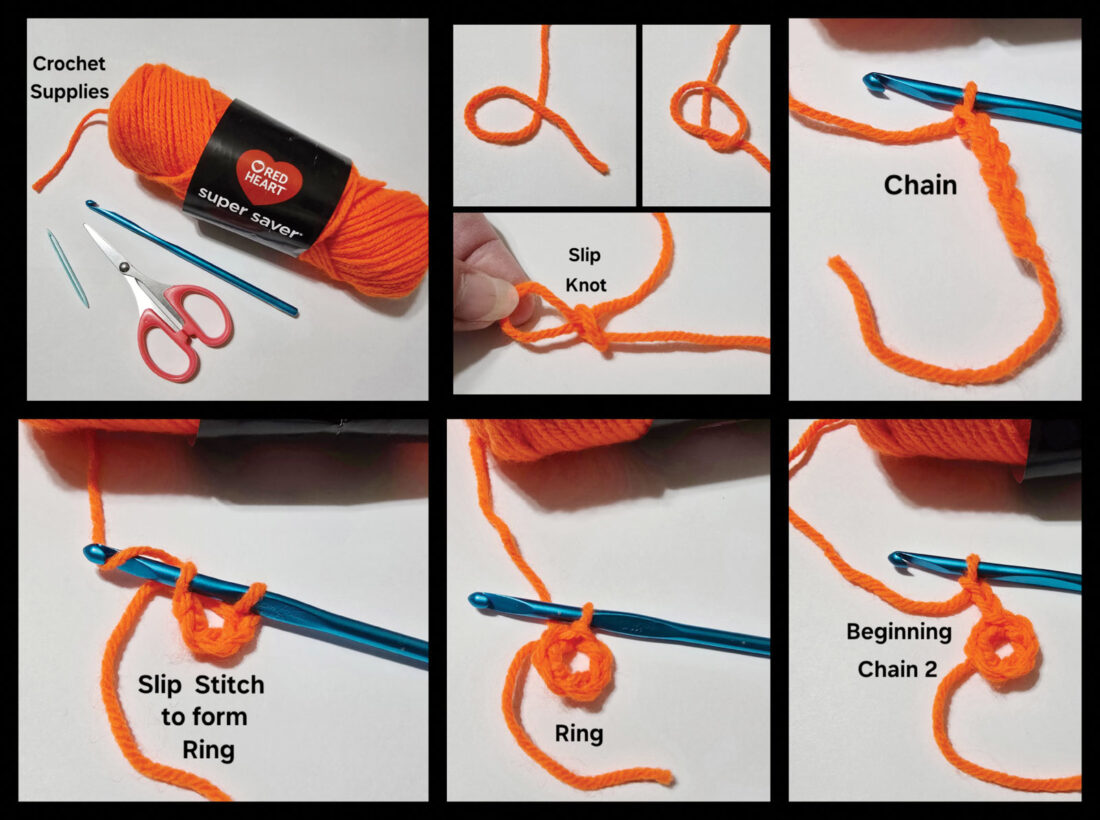
Like many other things, crochet uses abbreviations. Here are the ones we are using today: round (Rnd), slip stitch (sl st), chain (ch), double crochet (dc), stitches (sts), increase (inc). Also, “beginning chain” (beg ch) equals 1st stitch. If there is an increase in the first stitch of a round or row, there will be a “beginning chain” for first stitch and a second stitch in the same spot. ‘Work even” means one stitch per stitch. Commas equal “then” and parentheses group stitches or directions. I will introduce more to you soon.
Now for the fun stuff. So many projects can be made by combining circles and squares. This time I want to focus on circles. In patterns, circles are labeled in rounds. Before I give an example with specific stitch counts, I want to explain the parts for those who are new to crochet.
(Photo composite provided by Maurita Way)
To start a crochet piece, I use a slip knot. The loop is then placed on the hook and the chain is made by drawing the yarn through the loop over and over to desired length. To form a circle, a short chain is made, then joined with a slip stitch. A slip stitch starts with the loop on hook, hook goes into stitch or space in crochet, then yarn is drawn through everything. It joins or allows movement with the shortest height. Movement example: making spines down a dragon’s back with tiny slip stitch space between each.
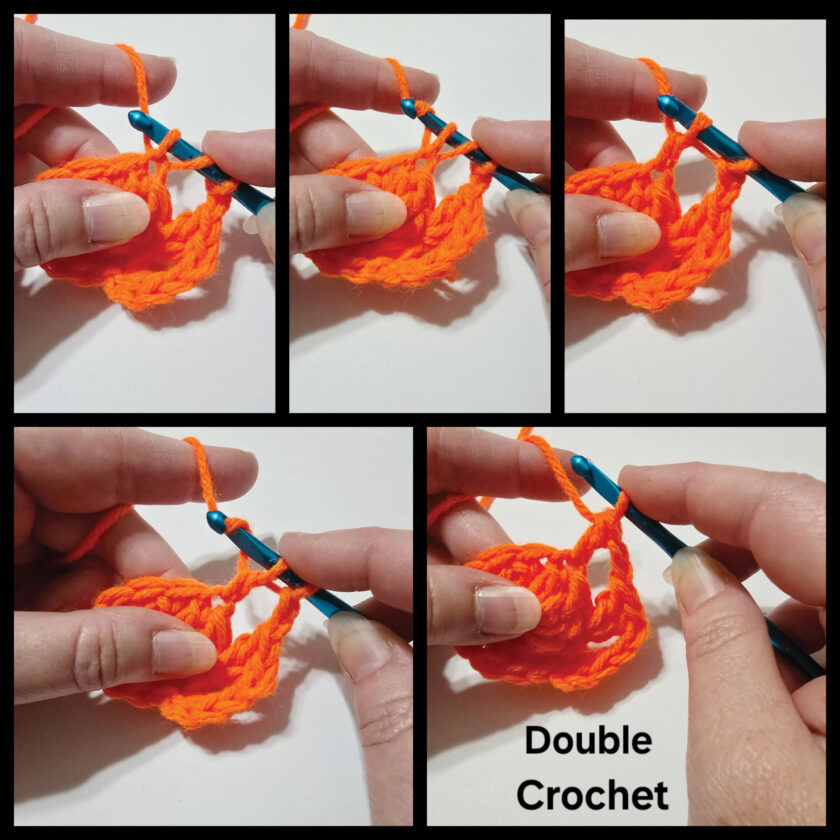
The first round of the circle is either crocheting into chains or crocheting into the hole of the ring. A chain-2 is usually used for a “beginning chain” to equal 1st double crochet. Increases expand the circle and decreases shrink or close it. An increase tends to be two stitches worked into the same spot. I hope you will join me again next time.
* Patterns to try
FINGER PUPPET BASE:
* Ring: ch4, join with sl st in 1st ch.
(Photo composite provided by Maurita Way)
* Rnd 1: ch2 (beg ch), 7 dc in ring, join with sl st in top of beg ch. (8dc total)
* Rnd 2-5: ch2, dc even, join in top of beg ch.
BASE CIRCLE:
* Ring: ch4, join with sl st in 1st ch.
* Rnd 1: ch2 (beg ch), 11dc in ring, join with sl st in top of beg ch. (12dc total)
* Rnd 2: dc inc every st, join. (24dc total)
* Rnd 3: (dc, dc inc)… repeat around. (36sts total)
* Rnd 4: (dc, dc, dc inc)… repeat around. (48sts total)
* Next Rnds: add one dc between increases to keep circle flat. Stitch counts: 60, 72, etc.
Local columns

Editor’s Notes: Staying on the campaign trail

Pace Negotiations: The News and Sentinel Half marathon is a team effort

Cracking the Code: Global hope for those who know and understand

Kiki’s Corner: How much do you like to cook?

Mid-Ohio Valley Climate Corner: ‘The Last American’
